
Here I am going to explain a method which can give you a perfect Dynamic Range. I am going to focus on exposure blending.
Why this method?
"Because this method gives me the most accurate color rendition which I saw on the actual site." I don't say that you should not use other methods like graduated neutral density filters, HDR etc. Just have this also in your set of tricks :). I prefer this method because it gives the most accurate colors. I don't promise that you can be a great photographer after reading this but I can definitely promise you will get all the colors right on the money.
Basic concept of blending :-
No camera in the market, can capture perfect dynamic range of colors which our eyes see (closely 16 stops). When shooting JPEGs Nikon D7000 claims to capture almost 14 stops at ISO 100. But that would be an ideal scenario. You can roughly get 8 stops in any situation with D7000 and 6 to 6.5 stops with D90/D300/5d/5d MII etc. So may be with D7000 type of cameras, 3 photographs are enough to get a perfect shot at Noon (very high contrast time). So when many professionals don't shoot, you can keep shooting :).
Few cameras may require total of 4 or 5 photographs. If you shoot RAW images, you will get much more dynamic range with any of DSLR camera.
So how it works?
There is a very simple logic. For covering all 16 stops of DR just cover 6 to 7 stops (worst case) in each photograph and uncover that part in photoshop.
Example:
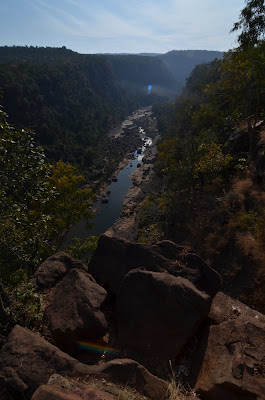
here are the 3 shots which I shot in Pachmadi MP India, at around noon.


Results:
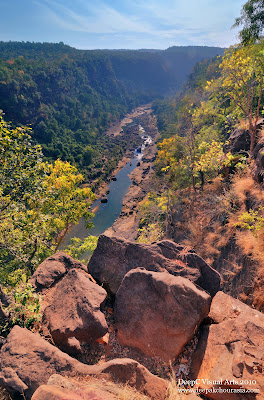
So how did I get this result?
I opened all 3 images as separate layers in Photoshop and aligned them using edit>>auto-align layers. Once the layers are aligned I used masking on all the layer, revealing correct color range which gives relatively more natural look. When you start revealing a part of an image, dont bother about more light or less light, first reveal all important parts from all 3 images then play with opacity to merge all images into a natural looking image. Don't forget to use soft edge brush else result will be harsh looking. Little trial and error will give you better idea. Though dont restrain yourself to this method. People use HDR on two images and reveal 3rd one or merge all using auto merge in phtoshop then reveal using same copies. Just try which works for you. I prefer blending over GND and HDR. Though GND is a great option when you are stitching so many images.
Once I had the final image, I just color corrected the image and fixed flare and little contrast. That is it. Total time taken was 15 mins. Please post your reply if you know better ways of doing this.
thanks
DeepC
http://www.deepakchourasia.com/
Why this method?
"Because this method gives me the most accurate color rendition which I saw on the actual site." I don't say that you should not use other methods like graduated neutral density filters, HDR etc. Just have this also in your set of tricks :). I prefer this method because it gives the most accurate colors. I don't promise that you can be a great photographer after reading this but I can definitely promise you will get all the colors right on the money.
Basic concept of blending :-
No camera in the market, can capture perfect dynamic range of colors which our eyes see (closely 16 stops). When shooting JPEGs Nikon D7000 claims to capture almost 14 stops at ISO 100. But that would be an ideal scenario. You can roughly get 8 stops in any situation with D7000 and 6 to 6.5 stops with D90/D300/5d/5d MII etc. So may be with D7000 type of cameras, 3 photographs are enough to get a perfect shot at Noon (very high contrast time). So when many professionals don't shoot, you can keep shooting :).
Few cameras may require total of 4 or 5 photographs. If you shoot RAW images, you will get much more dynamic range with any of DSLR camera.
So how it works?
There is a very simple logic. For covering all 16 stops of DR just cover 6 to 7 stops (worst case) in each photograph and uncover that part in photoshop.
Example:
here are the 3 shots which I shot in Pachmadi MP India, at around noon.


Results:

So how did I get this result?
I opened all 3 images as separate layers in Photoshop and aligned them using edit>>auto-align layers. Once the layers are aligned I used masking on all the layer, revealing correct color range which gives relatively more natural look. When you start revealing a part of an image, dont bother about more light or less light, first reveal all important parts from all 3 images then play with opacity to merge all images into a natural looking image. Don't forget to use soft edge brush else result will be harsh looking. Little trial and error will give you better idea. Though dont restrain yourself to this method. People use HDR on two images and reveal 3rd one or merge all using auto merge in phtoshop then reveal using same copies. Just try which works for you. I prefer blending over GND and HDR. Though GND is a great option when you are stitching so many images.
Once I had the final image, I just color corrected the image and fixed flare and little contrast. That is it. Total time taken was 15 mins. Please post your reply if you know better ways of doing this.
thanks
DeepC
http://www.deepakchourasia.com/
No comments:
Post a Comment