
Many of my friends and internet readers ask me that how do I get colorful photographs??? Is it because I am using a DSLR?????? My answer is NO, it is not because of a DSLR. It because of the wrong techniques people use. If you use correct settings on your camera, any point and shoot camera can create amazing photographs. However, most of the camera manufacturer try to design camera sensor in such a way which can capture most of the colors and dynamic range in any scene. For achieving that goal camera manufacturers try to push colors into the middle flat area of a histogram (gray colors) so that shadow and highlight values are preserved. That is why photos taken in auto mode look like they are dead.
Here I am going to give you few quick tips. First important thing to remember is, every photo should be retouched before it is used. Camera pushes as much as data possible to retain high picture quality. Later it is photographer's responsibility to settle that data in a correct way.
"First thing first", please download a free Microsoft software called Windows Photo Live Gallery and open your photograph using that. Here is how it will look.

Now click on Edit, Organize or Share on the top left corner of the window. You will see the following screen.

Now you will see your image in the center panel of your window. Please double click on your image and now you will be led to the following window:
 On the above window you will see so many picture-editing options that you can explore later by yourself. For now I am going to ask you to focus on "Fine Tune" which will open another window in the right panel of the current window:
 On the right panel window you will see basic options which are enough to enhance the quality of your photograph.
Let us see everything one after another:
Adjust Exposure: These are the main functions for fixing the dullness of your image. Most important part in any photograph is the Histogram which should be starting from left point where the data starts and it should end at right where the data ends. Data should not be passing the sliders as well as the sliders should not be away from the data. When I say histogram data it is the mountain like graph which you see on your left panel window. Histogram actually represents our data in the image. If your image has 12 mega pixels then histogram is made up of 12 million pixel colors. If you clip that data you will lose the image quality (but sometimes it preferred for dramatic effects).
Let me show you an easy example of one of my home portraits.
 If you see the photo looks dull in the colors, contrast and sharpness because the data is not scattered correctly throughout the image. If you observe there is some space left between the sliders and the data at both ends. Here is the histogram of the above photograph.

I just slid these sliders to close to the gaps between the end points where data is starting from both ends and the sliders. And you see my photo got improved right away. Here is the improved version.

See how the guys are popped up in the image just by doing a small shift in the histogram sliders.
Now next let us looks at other controls in Adjust Exposure. Brightness slider will increase/decrease brightness of overall image however on the contrary Highlights slider will increase/decrease overall brightness of only highlights in your image. Same is true for shadows when you use Shadows slider. Contrast slider increases/decreases contrast and depth in your image. Remember, moving all these sliders will also affect your histogram so before fixing the histogram I suggest you to fix the other controls first.
Adjust Colors: This control lets you fix temperature (cold to warm), tint and Saturation in your photograph. I mostly use the Color temperature and Saturation sliders and keep away from tint slider until I am creating a Black & White image.

Straighten Photo: Play with this control. Horizon in your image can be straightened using this control.
Adjust Details: In this control you can Sharpen and Reduce noise in your image. I use this control almost on all my images which I fix in windows live gallery. Analyze button will fix noise automatically in your image, though you can fix it by yourself just by playing with Reduce noise slider.
The last control I use the most is the Crop Tool from the top menus panel. You can use all other options too.
Here are few examples (Before & After):
I prefer desaturated colors in most of my portraits and saturated in the rest.


With the last image I did not care to save its data in the histogram and gave it a dramatic look. It is everyone's own preference how they want their photographs to look. This is about it. Happy shooting. Please feel free to leave me your comments.
thanks & regards
DeepC
http://www.deepakchourasia.com
Here I am going to give you few quick tips. First important thing to remember is, every photo should be retouched before it is used. Camera pushes as much as data possible to retain high picture quality. Later it is photographer's responsibility to settle that data in a correct way.
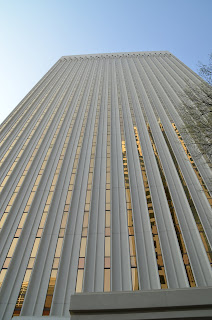
"First thing first", please download a free Microsoft software called Windows Photo Live Gallery and open your photograph using that. Here is how it will look.

Now click on Edit, Organize or Share on the top left corner of the window. You will see the following screen.

Now you will see your image in the center panel of your window. Please double click on your image and now you will be led to the following window:


Let us see everything one after another:
Adjust Exposure: These are the main functions for fixing the dullness of your image. Most important part in any photograph is the Histogram which should be starting from left point where the data starts and it should end at right where the data ends. Data should not be passing the sliders as well as the sliders should not be away from the data. When I say histogram data it is the mountain like graph which you see on your left panel window. Histogram actually represents our data in the image. If your image has 12 mega pixels then histogram is made up of 12 million pixel colors. If you clip that data you will lose the image quality (but sometimes it preferred for dramatic effects).
Let me show you an easy example of one of my home portraits.


I just slid these sliders to close to the gaps between the end points where data is starting from both ends and the sliders. And you see my photo got improved right away. Here is the improved version.

See how the guys are popped up in the image just by doing a small shift in the histogram sliders.
Now next let us looks at other controls in Adjust Exposure. Brightness slider will increase/decrease brightness of overall image however on the contrary Highlights slider will increase/decrease overall brightness of only highlights in your image. Same is true for shadows when you use Shadows slider. Contrast slider increases/decreases contrast and depth in your image. Remember, moving all these sliders will also affect your histogram so before fixing the histogram I suggest you to fix the other controls first.
Adjust Colors: This control lets you fix temperature (cold to warm), tint and Saturation in your photograph. I mostly use the Color temperature and Saturation sliders and keep away from tint slider until I am creating a Black & White image.

Straighten Photo: Play with this control. Horizon in your image can be straightened using this control.
Adjust Details: In this control you can Sharpen and Reduce noise in your image. I use this control almost on all my images which I fix in windows live gallery. Analyze button will fix noise automatically in your image, though you can fix it by yourself just by playing with Reduce noise slider.
The last control I use the most is the Crop Tool from the top menus panel. You can use all other options too.
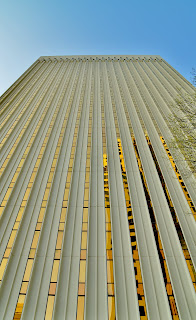
Here are few examples (Before & After):
I prefer desaturated colors in most of my portraits and saturated in the rest.


With the last image I did not care to save its data in the histogram and gave it a dramatic look. It is everyone's own preference how they want their photographs to look. This is about it. Happy shooting. Please feel free to leave me your comments.
thanks & regards
DeepC
http://www.deepakchourasia.com
No comments:
Post a Comment